Saturday, July 5, 2014

How To Auto Tag All Friends In A Facebook Comment With Single Click?

Many people want to tag all their friends in a Facebook post and when they do it manually they get tired.So for those people I have come up with a tutorial which you can follow to tag all your friends in a facebook photo/status with a single click only.This trick works perfectly and I have tested it.Using this trick you can tag your all friends in seconds whether its your status,photo etc.You can also tag your friends in any facebook page / any other persons post.Now by not wasting your time let me tell you how to tag all friends.First of all download the below given script of 50 Kb and then follow below given steps.

                               Download Script

Now after downloading the script follow these steps to use it:
  • Open any photo/status/video/any post in which you want to tag your all friends in a new Tab. (Tip: To open a post in a new tab click on the date/time of that post)
  • After opening the post in new tab press F12 from your keyboard to open ''Console''
  • Copy the download script completely using CTRL+A and then paste it using CTRL+V in the Console box.
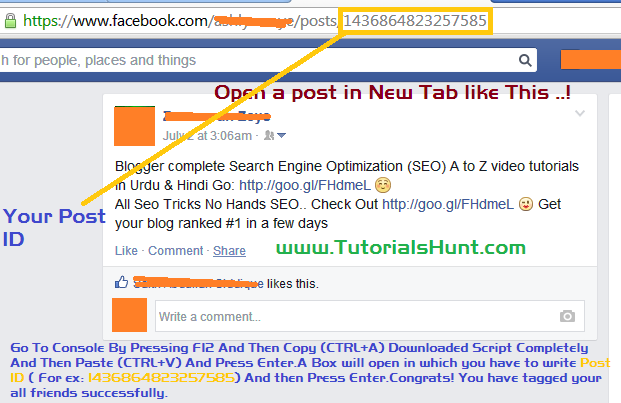
  • After that press enter and a new box will appear asking the post ID like this (See Screenshot):
  • Dont know what is post ID? Post ID is in numbers located in the URL of that post at last.For example this is a URL: https://www.facebook.com/photo.php?fbid=1507012646195542 then its FB ID will be ''1507012646195542'' You have to paste it in the box and then press ''Post'' button.
  • Wait after a few minutes it will say tagging completed refresh the page.After that refresh the page and enjoy.Congrats! You have successfully tagged all of your friends in a Facebook comment.
Also Read: How To Change Facebook Theme?

Final Words:

If you are having any problem regarding this post please feel free to comment.I will try my best to help you.Dont be selfish and share this post on social media sites to support us! You can also browse some more tricks of Facebook on our site.Just see the related posts below and enjoy!

Friday, July 4, 2014

How To Check If A Website & Domain Is Banned From Using Adsense Or Not?

Hey! Friends today I will tell you how you can check if your website/domain is permanently banned from using Google Adsense or not? Many people ask me that ads do not show on their domain and they are worried.This is due to illegal use of it.Many people do clicks on their own ads and some do invalid activity and thus they get banned from adsense.After getting kicked out they make a new adsense account and when they add ad code ads do not show up.So the reason is adsense has banned you.Once you get banned from adsense.You cannot use it on a domain on which you showed ads before.Now to check if your site is banned from adsense or not I am gonna tell you about tools to check if your site is banned from adsense or not? 

Tools To Check If A Site Is Banned Permanently From Using Adsense:

Google bans many websites everyday because publishers do illegal activity and thus they get blacklisted. By using below given tools you can check if a website is banned from using adsense or not? If a site once gets blacklisted adsense cannot be used on it forever.

1-IsBanned.com

On Isbanned.com you just have to enter your site's URL and it will tell you in a few seconds if adsense is banned on the respected site or not? If it says banned you cannot use adsense on it at all.

2-BannedCheck.com

Bannedcheck.com is an other same tool like Isbanned.com you can use to check if your domain is blacklisted in adsense or not.If you are not confirm about 1st tool use this one.

Final Words:

Using the above given methods you can check easily if your site is blocked from enjoying adsense or not.If you are having any problem related to Google Adsense please feel free to ask.I will try my best to solve your problem.

How To Auto Add All Friends In A Facebook Group With Single Click?

facebook, groups
Hello! Buddies today in this tutorial I will tell you how you can add all friends in your facebook group with a single click.People get tired when they add each of their friend manually because it takes a lot of time.For those people I have come up with a trick which you can use to add all your friends in your fb group with a single click.This trick works 100% and I have tested it.Actually this is a script which you have to use.Now by not wasting your time let me share this script first and then I will tell you how to use it to invite all your friends in any Facebook Group automatically.Download the script from below given download button.Dont worry its of 50Kb only. Also Read: How To Auto Post In All Facebook Groups At Once

                                 Download Script

Now to use this script follow the below given steps.
  • Open any facebook group in which you want to add your friends in a new tab.
  • After opening the group go to Console tab.
  • Now copy the downloaded script completely using CTRL+A and paste it in Console box using CTRL+V 
  • After pasting the script press enter and wait for 15 seconds.A flash box will appear and Your friends will be automatically being added in your group.
  • After your all friends are added box will look like this.
  • Now see I used the script to add friends.I was having 466 friends and my 423 friends got added in that group.Now you will be thinking why 42 friends are not added.So my answer is that they were already in that group.
  • Now refresh the page and see the magic.Congratulations you have successfully added your all friends in your Facebook group.

    Dont Be Selfish!

    I tried my best to explain you how to add your friends in your facebook group at once and now is your turn.Please dont be selfish and share this tutorial with you friends.If you are having any problem feel free to ask.Dont forget to share your experience about this tutorial.I will be eagerly waiting for your response.

    Friday, June 27, 2014

    How To Open Youtube Without Proxy Or Software In Pakistan

    unblock youtube,open youtube,proxy software.vpn connection.upload videos youtube,google adsense,zenmate extension,blogger ustaad,
    AoA! Friends today I am gonna tell you how you can browse Youtube easily without using any proxy,software like Hotspot Shield or Unblocking website while living in Pakistan.These are the latest methods in 2014 and are easy to use.There are actually 3 methods for opening Youtube in Pakistan.Now let me discuss all these methods in detail.

    Method 1 (Establishing A VPN Connection):

    In this method we will easily create a VPN connection in our computer and then browse youtube without any restrictions.After creating it we will just have to click on ''Connect'' button and it will be connected in seconds and you will be able to browse youtube using identity of USA or UK.Now let's see how to create it? Just follow the steps below:
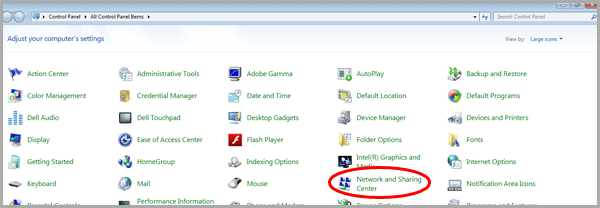
    • Go to Control Panel < Network & Internet < Network And Sharing Center
    • After opening Network And Sharing Center click on ''Set Up A New Connection or Network'' as shown below
    • Now click on ''Connect To A Work Place' at 4th number in the list

    • Now choose the very 1st option ''Use my Internet Connection VPN''
    • Now input the values of Intenet address and Destination Name given below in the boxes


    USA Best VPN

    VPN Server  : us.mybestvpn.com
    VPN Username: mybestvpn
    VPN Password: freevpn
    VPN Protocol: PPTP VPN

    UK Best VPN

    VPN Server  : uk.mybestvpn.com
    VPN Username: mybestvpn
    VPN Password: freevpn
    VPN Protocol: PPTP VPN
    Tip: If you want to use USA VPN then paste us.mybestvpn.com in Internet address field and in Destination name put ''My VPN Connection'' and then proceed to 'Next'
    • In the next step you just need to put the username and password given above in the boxes to connect to your newly created VPN connection give ''mybestvpn'' as Username and ''freevpn'' as password.

    • Now after connecting to VPN connection remember that before opening ant website after connecting to VPN it will show an agreement page.Click on ''I Agree'' and your VPN will be active

    • Now after clicking on ''I Agree'' open Youtube.com and enjoy surfing it normally without Ads and any other Problems.

    Method 2 (Using ZenMate Google Chrome Extension):

    In this method we will install ZenMate extension which is only for Google Chrome if you dont have Google Chrome download and install it.Now let me tell you how to install and use it.
    • After adding extension in your browser enter your email address and click on ''Get Secured'' 
    Congratulations! You have successfully unblocked Youtube and surf safely.If you are having any question feel free to ask.I will love answering them.Take care & Allah Hafiz!

      Thursday, June 26, 2014

      Top Seo Optimized Free Blogger Templates Of 2014

      A design of a blog is the most dynamic part.It's the second thing you need to worry about after choosing a perfect domain name.The design of your blog attracts both visitors and advertisers.People love to read your content if the layout of your blog is good.In blogger style of your blog is termed as ''template''.There are thousands of blogger templates around but today I am gonna share some ''top blogger templates'' which you should use on your blog.These templates are not simple templates these are professional templates designed by skilled designers who have a good experience in template designing and are successfully running their websites on which they provide awesome blogger templates free of cost.These templates are seo optimized and I am DAMN! sure that you will not have any problem in their optimization.These are elegant and new blogger templates with many features.You need a well coded and clean blogger template for your website.A good blogger template reduces a bounce rate of a blog.It helps visitors to find out what they want to see from your blog.Navigation is also another important part of template.A template easy to navigate makes a site look professional and helps viewers in browsing your blog.The templates I am gonna mention today in this list are perfect.They dont need any correction.Customization of these templates is also easy.So now let's see which are the best blogger templates in 2014.

      Maggner Blogger Template (Templateify):

      Maggner blogger template is similar to ribbon wordpress theme and is free of cost.It's having two columns and its best for displaying adsense ads too because of 480x60 banner space on header and 300x250 ads on sidebar.Its very easy to customize.

                                            Download Now

      Dynamic Mag Responsive Blogger Template (SeoBloggerTemplates):

      Dynamic mag is just like Sahifa wordpress theme.Its navigation is same like that.Its a premium blogger template but its free version is also available.It's seo optimized and attractive template which will look good on ''news'' niche.Its having automated posts slider too.

                                            Download Now

      Flat Mag Blogger Template (Templateism):

      Flat Mag is attractive blogger template which is also responsive especially designed for news and multimedia sites.It has a flexible design and visitors will surely love to browse it.

                                                  Download Now

      Magzon Blogger Template (Templateify):

      Magzon blogger template is professionally coded clean template designed for magazine blogs.It has been created using the latest HTML5 and CSS3.Its easy to use.

                                                           Download Now

      Androider Blogger Template (SeoBloggerTemplates):

      Androider blogger template is having a professional design especially designed for blogs with topics on mobile phone reviews apps and games etc.If you are gonna create a blog on android games and apps its the best ever template you will ever find. 

                                                 Download Now

      Mashable Multimedia Blogger Template (SeoBloggerTemplates):

      Dynamo template is an awesome template with 3 columns of high quality.Its designed for technology blog news and portal professionally.Its having dynamic features.

                                                 Download Now

      Blog Tube Professional Video Blogger Template (Templateism):

      Blog tube template is especially designed for video sharing sites.You just need to embed videos from youtube,vimeo,dailymotion etc and your videos will give up a professional look.Its having tons of features you will love to hear about.

                                                 Download Now


      Friday, June 20, 2014

      How To Create An Attractive Profile On Fiverr? Look Professional To Sell More

      fiverr gigs,fiverr profile
      Hey! Folks,today I will tell you how you can create an effective profile on Fiverr? As you know Fiverr is the best place to buy and sell things only for $5.Fiverr is a market place where people complete tasks known as 'Gigs' for $5.Millions of people from worldwide are using it and earning huge income daily by completing tasks for buyers.Every task completed on Fiverr rewards $5 from which $1 is deducted by Fiverr.There are different categories of Gigs in it.Now the main thing is to sell your Gigs.People think that its easy they will once create a Gig and will get orders the next day,but this isn't true.You have to work hard in every field to make money but once your business on Fiverr gets started.You dont need to panic any more.You will grow up day by day.When I started working on it I also faced many problems I was not getting orders at all and I was very sad.After two weeks on Fiverr I got my first order and I was quite happy with that.One of my friend gave me tips to make an effective profile on fiverr which worked like a charm! And today I am gonna share with you so that you can also become a ''Top Rated Seller'' quickly as I am today.Now the question which comes to our mind is how we can sell more? How we can drive traffic to our Gigs fast? 

      Tips To Create An Effective Fiverr Profile: 

      To sell your gigs quickly on Fiverr you need to create an effective profile which attracts buyers and they get forced to buy your services.This is not a magic but It works like a magic.

      Name Of Person:

      The main and the most important part of a profile is its name.You should always use your real name instead of other names.For example if you are a Seo Consultant so dont write your name as ''Seo Worker'', ''Seo Expert'' nor your companies name.You should'nt write your name as given examples because most of scammers use these type of names so that they cannot be caught after scam.Buyers dont trust people with these type of names.You should use real name which looks professional like: ''James Cameron'' 

      Profile Picture:

      Profile picture is the dynamic part of a profile and it should look attractive.You should use your own profile picture instead of any wallpaper or picture of a famous personality.If you dont wanna upload someone's picture then grab unknown person's photo.

      Country:

      As per my experience If you are a Pakistani Or Indian you should select ''United States'' / ''United Kingdom'' as your default country.One of my friend was a well experienced writer.I suggested him to join Fiverr because I thought he can get more work with this.When he started working he selected ''India'' as his country but he did not get any orders and a month passed.He consulted me and I suggested him to use ''USA'' as his country after he applied changes the next day he got two orders from 2 people to write an article on ''Android Phones'' He was amazed with my changing.He asked me for the reason.I told him that people of USA have good writing skills and they can speak English well so being an article writer you should use USA country.Well this is my experience and I suggest you to try it.

      Your Bio:

      Bio of a person is the most valuable part of a profile.This describes how skilled the person is.You should always right a bio of yourself which describes you in short words.You should not write it as kids do: ''My name is Haroon.I am a blogger and my age is 16'' Kids do like that and you need to look like a professional.Here is an example of attractive bio: ''I am a type 1 diabetic, vegan, and full-time college student. Currently, I study English literature and creative writing (plus some history and science!) in Maine. I am proficient in (all sorts of) writing and editing''   

      Your Turn:

      Well now comes your turn to share your experiences on Fiverr.Have more killer tips? We will love to update this post.We are eagerly waiting for your response on this post.Dont forget to share it!

      Thursday, June 19, 2014

      How To Set Up A Custom Domain In Blogger? (Urdu/Hindi)

      Hello! World today in this tutorial I will tell you how you can set up a custom domain in blogger? The process for adding a custom domain in blogger is very easy but it seems difficult to some of newbies because they have never added a custom domain in Blogger.When I was a newbie I also had faced many problems in adding it.I didn't knew about DNS management.I was only given a written guide but that did not result helpful for me because the tutorial was only in text without images and I was not provided with a video too.So after searching on the internet by trying new ways I finally added it.So for beginners I am making this video tutorial so that they can not face any problem in adding it.

      Why Should You Have A Custom Domain?

      Now the main question that comes into our mind is why should we have it?
      • You should have a custom domain for your blogger blog because after adding it your blog looks professional and people like to read it.
      • You should have it because 80% of people from search engines like to go to .com extension sites while 20% of people like to go to .blogspot blogs.Now you can clearly feel the difference.
      • Domains are SEO friendly and you can get a good rank in search engines with a low period of time.
      • You can build more trust if you sell things on your blog.
      • You can get more quality links because some sites dont give backlinks to .blogspot blogs
      • Url of your blog will be shorten and it will be easy for people to remember your site.

      Which Domain Registrar Is Reliable And Cheap?

      Now let me come to the point that from which domain registrar we should register our domain? According to me GoDaddy and Global Hosting Service are the best.
      • GoDaddy: Godady is one of the cheapest domain name registrars providing domains upto $3/Year using coupon and without coupon $9/Year.They are hosting more than 10,000 domains.You can easily register a domain with them.You will have to pay them through Paypal.What to do if you dont have a Paypal account? (Answer: Use Global Hosting Service)
      • Global Hosting Service: It is a pakistani hosting website which offers domains and hosting.It is the cheapest domain hosting website in Pakistan and is #1 in our post: Top 5 Cheap And Reliable Hosting Companies In Pakistan If you dont have a Paypal account then use it because you can send them money using Eaisypaisa.

      How Set Up Domain In Blogger Using DNS Management?

      Setting up a custom domain in blogger is really a headache for newbies because they dont have any experience with it and the process is different for each domain hosting site.Now let me tell you how can you add a domain in blogger?

      Tutorial

      Now please watch the video tutorial in urdu/hindi about how you can set up a custom domain in your blogger blog? Just follow the steps given in this video tutorial.If you dont understand language dont get panic.Its so easy.Just consider the steps done for adding a domain.And let me know if you have any problem in setting up a custom domain:

      Final Words:

      Now you have watched the video tutorial so I hope that it would have resulted helpful for you.Please if you have any question regarding this tutorial let me know in comments.I will try my best to solve your problem.Further ask your domain name provider if it is a big issue.They will help you out using their online support! Dont forget to share this video tutorial with other bloggers so that they can get help from it!